db-schemachange is a simple, lightweight python based tool to manage database objects for Databricks, Snowflake, MySQL, Postgres, SQL Server, and Oracle. It
follows an Imperative-style approach to Database Change Management (DCM) and was inspired by
the Flyway database migration tool. When combined with a version control system and a CI/CD
tool, database changes can be approved and deployed through a pipeline using modern software delivery practices. As such
schemachange plays a critical role in enabling Database (or Data) DevOps.
Installation options
You can install the db-schemachange package with all available connectors, or you can choose a specific one that suits your needs for a lighter installation.
pip install --upgrade db-schemachange # Install the package WITHOUT connectors
pip install --upgrade "db-schemachange[all]" # Install the package with all connectors
pip install --upgrade "db-schemachange[postgres]" # Install the package with Postgres connector
pip install --upgrade "db-schemachange[sqlserver]" # Install the package with SQL Server connector
pip install --upgrade "db-schemachange[mysql]" # Install the package with MySQL connector
pip install --upgrade "db-schemachange[oracle]" # Install the package with Oracle connector
pip install --upgrade "db-schemachange[snowflake]" # Install the package with Snowflake connector
pip install --upgrade "db-schemachange[databricks]" # Install the package with Databricks connector
Project Structure
(project_root)
|
|-- folder_1
    |-- V1.1.1__first_change.sql
    |-- V1.1.2__second_change.sql
    |-- R__sp_add_sales.sql
    |-- R__fn_get_timezone.sql
|-- folder_2
    |-- folder_3
        |-- V1.1.3__third_change.sql
        |-- R__fn_sort_ascii.sql
The db-schemachange folder structure is very flexible. The project_root folder is specified with the -f
or --root-folder argument. db-schemachange only pays attention to the filenames, not the paths. Therefore, under
the project_root folder you are free to arrange the change scripts any way you see fit. You can have as many
subfolders (and nested subfolders) as you would like.
Change Scripts
Versioned Script Naming
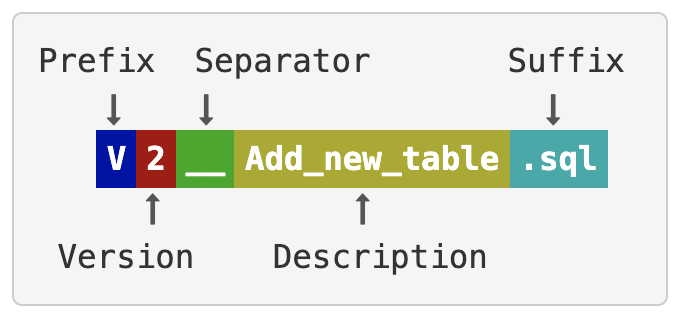
Versioned change scripts follow a similar naming convention to that used by Flyway Versioned Migrations. The script name must follow this pattern (image taken from Flyway docs):
With the following rules for each part of the filename:
- Prefix: The letter 'V' for versioned change
- Version: A unique version number with dots or underscores separating as many number parts as you like
- Separator: __ (two underscores)
- Description: An arbitrary description with words separated by underscores or spaces (can not include two underscores)
- Suffix: .sql or .sql.jinja
For example, a script name that follows this convention is: V1.1.1__first_change.sql. As with Flyway, the unique
version string is very flexible. You just need to be consistent and always use the same convention, like 3 sets of
numbers separated by periods. Here are a few valid version strings:
- 1.1
- 1_1
- 1.2.3
- 1_2_3
Every script within a database folder must have a unique version number. db-schemachange will check for duplicate version
numbers and throw an error if it finds any. This helps to ensure that developers who are working in parallel don't
accidentally (re-)use the same version number.
Repeatable Script Naming
Repeatable change scripts follow a similar naming convention to that used by Flyway Versioned Migrations. The script name must follow this pattern (image taken from Flyway docs):
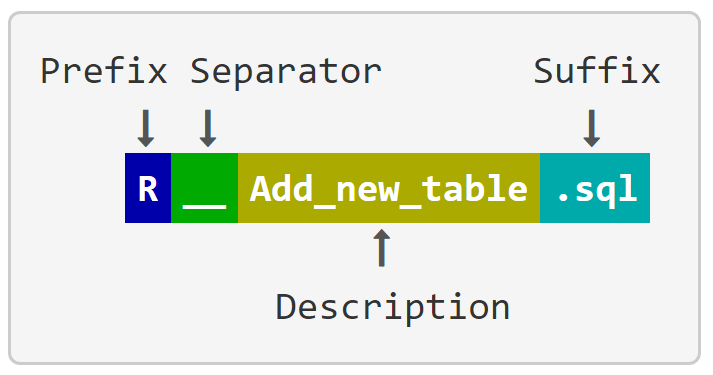
e.g:
- R__sp_add_sales.sql
- R__fn_get_timezone.sql
- R__fn_sort_ascii.sql
All repeatable change scripts are applied each time the utility is run, if there is a change in the file. Repeatable scripts could be used for maintaining code that always needs to be applied in its entirety. e.g. stores procedures, functions and view definitions etc.
Just like Flyway, within a single migration run, repeatable scripts are always applied after all pending versioned scripts have been executed. Repeatable scripts are applied in alphabetical order of their description.
Always Script Naming
Always change scripts are executed with every run of db-schemachange. This is an addition to the implementation
of Flyway Versioned Migrations.
The script name must follow this pattern:
A__Some_description.sql
e.g.
- A__add_user.sql
- A__assign_roles.sql
This type of change script is useful for an environment set up after cloning. Always scripts are applied always last.
Rollback Script Naming
Rollback script supports reverting database changes after a failed deployment. The script name must follow this pattern: RB_[V<version>|R|A]__Some_description.sql. In other words, the Rollback filename should be RB_<scrip_name> where <scrip_name> is one of the three above script types.
e.g.
- RB_V0.0.1__CREATE_TABLE.SQL
- RB_R__CREATE_VIEW.SQL
- RB_A__ASSIGN_ROLES.SQL
Script Requirements
db-schemachange is designed to be very lightweight and not impose too many limitations. Each change script can have any
number of SQL statements within it and must supply the necessary context, like catalog/database and schema names. db-schemachange will simply run the contents of each script against
the target database, in the correct order. After each script, Schemachange will execute "reset" the context (catalog/database, schema) to the values used to configure the connector.
Using Variables in Scripts
db-schemachange supports the jinja engine for a variable replacement strategy. One important use of variables is to support
multiple environments (dev, test, prod) in a single database by dynamically changing the database name during
deployment. To use a variable in a change script, use this syntax anywhere in the script: {{ variable1 }}.
To pass variables to db-schemachange, check out the Configuration section below. You can either use
the --vars command line parameter or the YAML config file schemachange-config.yml. For the command line version you
can pass variables like this: --vars '{"variable1": "value", "variable2": "value2"}'. This parameter accepts a flat
JSON object formatted as a string.
Nested objects and arrays don't make sense at this point and aren't supported.
db-schemachange will replace any variable placeholders before running your change script code and will throw an error if it
finds any variable placeholders that haven't been replaced.
Secrets filtering
While many CI/CD tools already have the capability to filter secrets, it is best that any tool also does not output secrets to the console or logs. Schemachange implements secrets filtering in a number of areas to ensure secrets are not writen to the console or logs.
A secret is either a standard variable that has been tagged as a secret or a parameter of connection config input that considered as a secret. This is determined using a naming convention and either of the following will tag a variable/conection parameter as a secret:
- The name has the word
secret,pwd,passwd,password, ortokenin it.config-version: 1
vars:
bucket_name: S3://...... # not a secret
secret_key: 567576D8E # a secretpassword: asDqTT@!#12 # a secret
credentials_provider:
client_id: wq5e121f-k952-4002-942e-tt24c1tww452 # not a secret
client_secret: prtpw9c03tw2lwe3c89c2054lw2025tw9842 # a secret - The variable is a child of a key named
secrets.config-version: 1
vars:
secrets:
my_key: 567576D8E # a secret
aws:
bucket_name: S3://...... # not a secret
secrets:
encryption_key: FGDSUUEHDHJK # a secret
us_east_1:
encryption_key: sdsdsd # a secret
Jinja templating engine
db-schemachange uses the Jinja templating engine internally and
supports: expressions, macros, includes
and template inheritance.
These files can be stored in the root-folder but db-schemachange also provides a separate modules
folder --modules-folder. This allows common logic to be stored outside of the main changes scripts.
The Jinja auto-escaping feature is disabled in db-schemachange, this feature in Jinja is currently designed for where the
output language is HTML/XML. So if you are using db-schemachange with untrusted inputs you will need to handle this within
your change scripts.
Change History Table
db-schemachange records all applied changes scripts to the change history table. By default, db-schemachange will attempt to
log all activities to the METADATA.[SCHEMACHANGE].CHANGE_HISTORY table, based on the database you are using. The name and location of the change history
table can be overriden via a command line argument (-c or --change-history-table) or the schemachange-config.yml
file (change-history-table). The value passed to the parameter can have a one, two, or three part name (e.g. "
TABLE_NAME", or "SCHEMA_NAME.TABLE_NAME", or " DATABASE_NAME.SCHEMA_NAME.TABLE_NAME"). This can be used to support
multiple environments (dev, test, prod).
By default, db-schemachange will not try to create the change history table, and it will fail if the table does not exist.
This behavior can be altered by passing in the --create-change-history-table argument or adding
create-change-history-table: true to the schemachange-config.yml file. Even with the --create-change-history-table
parameter, db-schemachange will not attempt to create the database for the change history table. That must be created
before running db-schemachange.
The structure of the CHANGE_HISTORY table is as follows:
| Column Name | Type | Example |
|---|---|---|
| VERSION | VARCHAR(1000) | 1.1.1 |
| DESCRIPTION | VARCHAR(1000) | First change |
| SCRIPT | VARCHAR(1000) | V1.1.1__first_change.sql |
| SCRIPT_TYPE | VARCHAR(1000) | V |
| CHECKSUM | VARCHAR(1000) | 38e5ba03b1a6d2... |
| EXECUTION_TIME | BIGINT | 4 |
| STATUS | VARCHAR(1000) | SUCCESS |
| BATCH_ID | VARCHAR(1000) | 38e5ba03b1a6d2... |
| BATCH_STATUS | VARCHAR(1000) | SUCCESS |
| INSTALLED_BY | VARCHAR(1000) | DATABASE_USER |
| INSTALLED_ON | TIMESTAMP | 2020-03-17 12:54:33.123 |
There is a specific BATCH_ID associated with each deployment.
A new row will be added to this table every time a change script has been applied to the database. db-schemachange will use
this table to identify which changes have been applied to the database and will not apply the same version more than
once, with BATCH_STATUS = IN_PROGRESS.
After all scripts are applied, the BATCH_STATUS will be updated to SUCCESS. If any of the scripts failed, the deployment stopped and BATCH_STATUS will be set to FAILED.
If you are running a rollback command, each script was rolled back will be updated with STATUS = ROLLED_BACK.
After all scripts are reverted, the BATCH_STATUS is set to ROLLED_BACK. If any of the rollback scripts failed, the BATCH_STATUS will be set to ROLLED_BACK_FAILED.
Here is the current schema DDL for the change history table (found in the schemachange/cli.py script), in case you choose to create it manually and not use the --create-change-history-table parameter:
CREATE TABLE IF NOT EXISTS METADATA.[SCHEMACHANGE].CHANGE_HISTORY
(
    VERSION VARCHAR(1000),
    DESCRIPTION VARCHAR(1000),
    SCRIPT VARCHAR(1000),
    SCRIPT_TYPE VARCHAR(1000),
    CHECKSUM VARCHAR(1000),
    EXECUTION_TIME BIGINT,
    STATUS VARCHAR(1000),
    BATCH_ID VARCHAR(1000),
    BATCH_STATUS VARCHAR(1000),
    INSTALLED_BY VARCHAR(1000),
    INSTALLED_ON TIMESTAMP
)
Configuration
db-schemachange configuration
Schemachange-specific parameters can be supplied in two different ways (in order of priority):
- Command Line Arguments
- YAML config file
vars provided via command-line argument will be merged with vars provided via YAML config.
CLI usage
deploy
This is the main command that runs the deployment process.
usage: schemachange deploy [-h] \
  [--config-folder CONFIG_FOLDER] \
  [--config-file-name CONFIG_FILE_NAME] \
  [-f ROOT_FOLDER] \
  [-m MODULES_FOLDER] \
  [--vars VARS] \
  [--db-type DB_TYPE] \
  [--connections-file-path CONNECTIONS_FILE_PATH] \
  [-c CHANGE_HISTORY_TABLE] \
  [--create-change-history-table] \
  [--query-tag QUERY_TAG] \
  [-v] \
  [-ac] \
  [--dry-run]
| Parameter | Description |
|---|---|
| -h, --help | Show the help message and exit |
| --config-folder CONFIG_FOLDER | The folder to look in for the schemachange config file (the default is the current working directory) |
| --config-file-name CONFIG_FILE_NAME | The file name of the schemachange config file. (the default is schemachange-config.yml) |
| -f ROOT_FOLDER, --root-folder ROOT_FOLDER | The root folder for the database change scripts. The default is the current directory. |
| -m MODULES_FOLDER, --modules-folder MODULES_FOLDER | The modules folder for jinja macros and templates to be used across mutliple scripts |
| --vars VARS | Define values for the variables to replaced in change scripts, given in JSON format. Vars supplied via the command line will be merged with YAML-supplied vars (e.g. '{"variable1": "value1", "variable2": "value2"}') |
| -v, --verbose | Display verbose debugging details during execution. The default is 'False'. |
| --db-type | Database type to run schemachange against. Should be one of [DATABRICKS, MYSQL, ORACLE, POSTGRES, SNOWFLAKE, SQL_SERVER] |
| --connections-file-path CONNECTIONS_FILE_PATH | YAML file for connection detail such as username, password, database,... |
| -c CHANGE_HISTORY_TABLE, --change-history-table CHANGE_HISTORY_TABLE | Used to override the default name of the change history table (which is METADATA.[SCHEMACHANGE].CHANGE_HISTORY) |
| --create-change-history-table | Create the change history table if it does not exist. The default is 'False'. |
| -ac, --autocommit | Enable autocommit feature for DML commands. The default is 'False'. |
| --dry-run | Run schemachange in dry run mode. The default is 'False'. |
| --query-tag | A string to include in the QUERY_TAG that is attached to every SQL statement executed. |
| --force | (Aggressive deployment mode) Force deploy specific versioned scripts. The default is 'False' |
| --from-version | (Aggressive deployment mode) Start version of aggressive deployment |
| --to-version | (Aggressive deployment mode) End version of aggressive deployment |
render
This subcommand is used to render a single script to the console. It is intended to support the development and troubleshooting of script that use features from the jinja template engine.
usage: schemachange render [-h] \
  [--config-folder CONFIG_FOLDER] \
  [-f ROOT_FOLDER] \
  [-m MODULES_FOLDER] \
  [--vars VARS] \
  [-v] script
| Parameter | Description |
|---|---|
| --config-folder CONFIG_FOLDER | The folder to look in for the schemachange-config.yml file (the default is the current working directory) |
| -f ROOT_FOLDER, --root-folder ROOT_FOLDER | The root folder for the database change scripts |
| -m MODULES_FOLDER, --modules-folder MODULES_FOLDER | The modules folder for jinja macros and templates to be used across multiple scripts |
| --vars VARS | Define values for the variables to replaced in change scripts, given in JSON format (e.g. {"variable1": "value1", "variable2": "value2"}) |
| -v, --verbose | Display verbose debugging details during execution (the default is False) |
rollback
The command is the same as the deploy command, plus an additional required parameter --batch-id for the ID of the batch that we need to revert the changes. The batch ID information is only available through CLI, not the YAML config file, since the config file is more suitable for static configurations.
usage: schemachange rollback [-h] \
  [--config-folder CONFIG_FOLDER] \
  [--config-file-name CONFIG_FILE_NAME] \
  [-f ROOT_FOLDER] \
  [-m MODULES_FOLDER] \
  [--vars VARS] \
  [--db-type DB_TYPE] \
  [--connections-file-path CONNECTIONS_FILE_PATH] \
  [-c CHANGE_HISTORY_TABLE] \
  [--create-change-history-table] \
  [--query-tag QUERY_TAG] \
  [-v] \
  [-ac] \
  [--dry-run] \
  [--batch-id BATCH_ID]
YAML config file
By default, Schemachange expects the YAML config file to be named schemachange-config.yml, located in the current
working directory. The YAML file name can be overridden with the
--config-file-name command-line argument. The folder can be overridden by using the
--config-folder command-line argument
Here is the list of available configurations in the schemachange-config.yml file:
# Database type
db-type: MYSQL

# Path to connection detail file
connections-file-path: null

# The root folder for the database change scripts
root-folder: "/path/to/folder"

# The modules folder for jinja macros and templates to be used across multiple scripts.
modules-folder: null

# Used to override the default name of the change history table (the default is METADATA.SCHEMACHANGE.CHANGE_HISTORY)
change-history-table: null

# Create the change history schema and table, if they do not exist (the default is False)
create-change-history-table: false

# Define values for the variables to replaced in change scripts. vars supplied via the command line will be merged into YAML-supplied vars
vars:
  var1: "value1"
  var2: "value2"
  secrets:
    var3: "value3" # This is considered a secret and will not be displayed in any output

# Enable autocommit feature for DML commands (the default is False)
autocommit: false

# Display verbose debugging details during execution (the default is False)
verbose: false

# Run schemachange in dry run mode (the default is False)
dry-run: false

# A string to include in the QUERY_TAG that is attached to every SQL statement executed
query-tag: "QUERY_TAG"
connections-config.yml
Connection detail of the database passed in --connections-file-path CLI parameter or connections-file-path property in YAML config file. Please refer to Authentication
Authentication
Schemachange supports the many of the authentication methods supported by the each database connector.
Please see below sample YAML file to pass in --connections-file-path parameter
Databricks
Allowed parameters in https://docs.databricks.com/aws/en/dev-tools/python-sql-connector#connection-class and few other options
server_hostname: "<ws_id>.cloud.databricks.com"
http_path: "/sql/1.0/warehouse/<warehouse_id>"
access_token: "<access_token>"
auth_type: "<oauth>"
credentials_provider:
  client_id: "<client_id>"
  client_secret: "<client_secret>"
password: <password>
username: <username>
session_configuration: # Spark session configuration parameters
  spark.sql.variable.substitute: true
http_headers:
  - !!python/tuple ["header_1", "value_1"]
  - !!python/tuple ["header_2", "value_2"]
catalog: <catalog>
schema: <schema>
use_cloud_fetch: false
user_agent_entry: "<application_name>"
use_inline_params: false
oauth_client_id: "<oauth_client_id>"
oauth_redirect_port: 443
MySQL
Allowed parameters in https://dev.mysql.com/doc/connector-python/en/connector-python-connectargs.html and few other options
database: "<database>"
user: "<user>"
password: "<password>"
host: "<host>"
port: 3306
# ...others
Oracle
Allowed parameters in oracledb/connection.py::connect of Python Oracle connector package oracledb
user: "<user>"
password: "<password>"
host: "<host>"
port: "<port>"
service_name: "<service_name>"
# ...others
Postgres
Allowed parameters in https://www.postgresql.org/docs/current/libpq-connect.html#LIBPQ-PARAMKEYWORDS and few other options in psycopg/connection.py::connect of psycopg package
host: "<host>"
port: "<port>"
dbname: "<dbname>"
user: "<user>"
password: "<password>"
# ...others
Snowflake
Allowed parameters in snowflake/connector/connection.py::DEFAULT_CONFIGURATION of snowflake-connector-python package
user: "<user>"
password: "<password>"
database: "<database>"
schema: "<schema>"
warehouse: "<warehouse>"
role: "<role>"
account: "<account>"
# ...others
SQL Server
Allowed parameters in pymssql/_pymssql.pyi::connect of pymssql package
server: "<server>"
user: "<user>"
password: "<password>"
database: "<database>"
# ...others
Yaml Jinja support
The YAML config file supports the jinja templating language and has a custom function "env_var" to access environmental variables. Jinja variables are unavailable and not yet loaded since they are supplied by the YAML file. Customisation of the YAML file can only happen through values passed via environment variables.
env_var
Provides access to environmental variables. The function can be used two different ways.
Return the value of the environmental variable if it exists, otherwise return the default value.
{{ env_var('<environmental_variable>', 'default') }}
Return the value of the environmental variable if it exists, otherwise raise an error.
{{ env_var('<environmental_variable>') }}
Running schemachange
Prerequisites
In order to run schemachange you must have the following:
- You will need to have a recent version of python 3 installed
- You will need to create the change history table used by schemachange in the database (
see Change History Table above for more details)
- First, you will need to create a database/catalog to store your change history table (schemachange will not help you with this).
- Second, you will need to create the change history schema and table. You can do this manually (
see Change History Table above for the DDL) or have schemachange create them by running
it with the
--create-change-history-tableparameter (just make sure the user you're running schemachange with has privileges to create a schema and table in that database)
- You will need to create (or choose) a user account that has privileges to apply the changes in your change script
- Don't forget that this user also needs the SELECT and INSERT privileges on the change history table
Running the Script
schemachange is a single python script located at schemachange/cli.py. It can be executed as
follows:
python -m schemachange.cli [subcommand] [-h] \
  [--config-folder CONFIG_FOLDER] \
  [--config-file-name CONFIG_FILE_NAME] \
  [-f ROOT_FOLDER] \
  [-m MODULES_FOLDER] \
  [--vars VARS] \
  [--db-type DB_TYPE] \
  [--connections-file-path CONNECTIONS_FILE_PATH] \
  [-c CHANGE_HISTORY_TABLE] \
  [--create-change-history-table] \
  [--query-tag QUERY_TAG] \
  [-v] \
  [-ac] \
  [--dry-run]
Or if installed via pip, it can be executed as follows:
# Build library from source
pip install --upgrade build
pip install --upgrade -r requirements.txt
python -m build
pip install dist/db_schemachange-*-py3-none-any.whl

# Or install via PyPI
pip install --upgrade "db-schemachange[all]" # Install the package with all connectors
pip install --upgrade "db-schemachange[databricks]" # Or install the package with specific connector

# Run the command
schemachange [subcommand] [-h] \
  [--config-folder CONFIG_FOLDER] \
  [--config-file-name CONFIG_FILE_NAME] \
  [-f ROOT_FOLDER] \
  [-m MODULES_FOLDER] \
  [--vars VARS] \
  [--db-type DB_TYPE] \
  [--connections-file-path CONNECTIONS_FILE_PATH] \
  [-c CHANGE_HISTORY_TABLE] \
  [--create-change-history-table] \
  [--query-tag QUERY_TAG] \
  [-v] \
  [-ac] \
  [--dry-run]
- Make sure you've completed the Prerequisites steps above
- Get a copy of this schemachange repository (either via a clone or download)
- Open a shell and change directory to your copy of the schemachange repository
- Run schemachange (see Running the Script above) with your database connection details and respective demo project as the root folder (make sure you use the full path)
Using Docker
docker run -it --rm \
  --name schemachange-script \
  -v "$PWD":/usr/src/schemachange \
  -w /usr/src/schemachange \
  python:3 /bin/bash -c "pip install --upgrade 'db-schemachange[all]' && schemachange [subcommand] [-h] [--config-folder CONFIG_FOLDER] [--config-file-name CONFIG_FILE_NAME] [-f ROOT_FOLDER] [-m MODULES_FOLDER] [--vars VARS] [--db-type DB_TYPE] [--connections-file-path CONNECTIONS_FILE_PATH] [-c CHANGE_HISTORY_TABLE] [--create-change-history-table] [--query-tag QUERY_TAG] [-v] [-ac] [--dry-run]"
Aggressive deployment
Forces deployment of specific script versions, bypassing the maximum published version check in the change history table. Use with caution.
When using the deploy command with the --force, --from-version, and --to-version parameters,
the system will always deploy versioned scripts found within the project folder
that fall within the specified version range.
Deployment process of both repeatable scripts and always scripts will still adhere to existing conventions.
Maintainers
- Lam Tran (@LTranData)
Demo
schemachange deploy \
  --verbose \
  --vars '{"secret":"abc"}' \
  --connections-file-path demo/mysql/config/connections-config.yml \
  --config-folder demo/mysql/config \
  --root-folder demo/mysql/scripts \
  --db-type MYSQL \
  --create-change-history-table